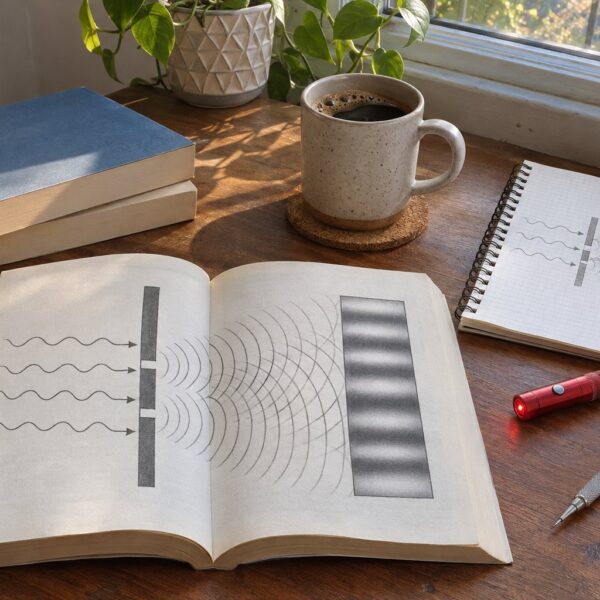

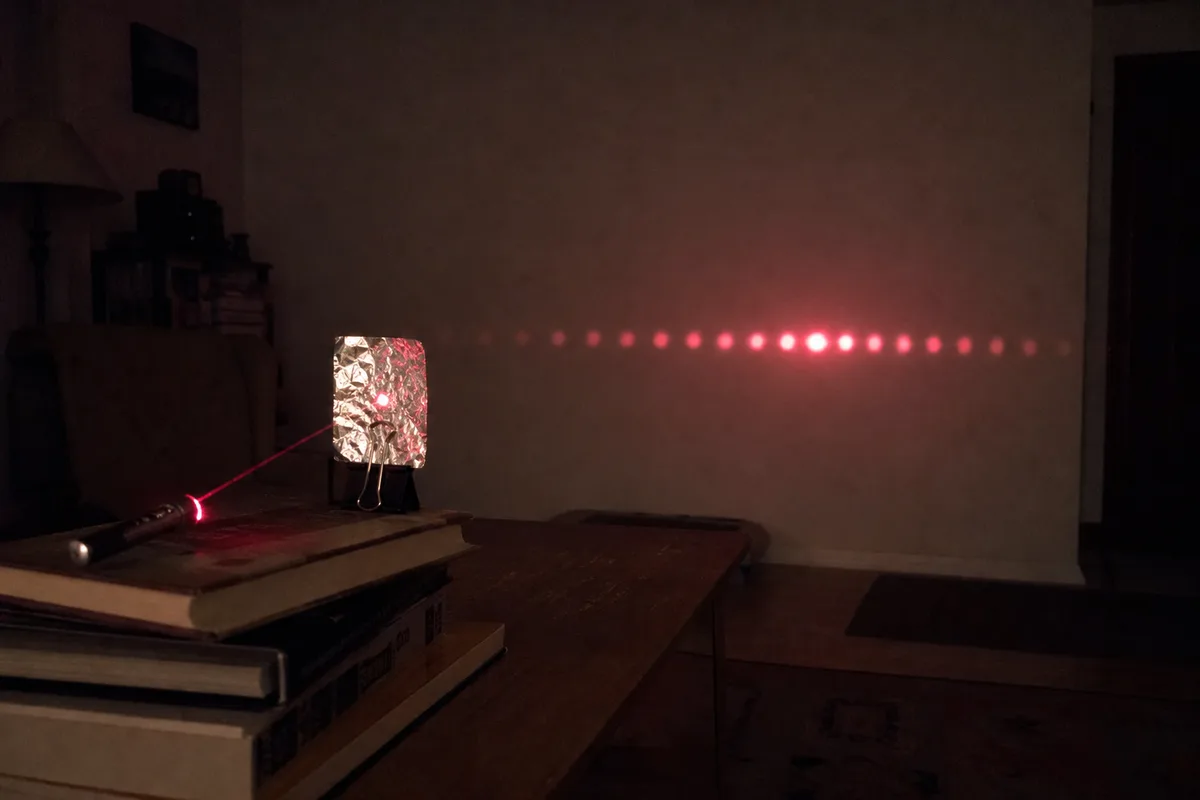
You can do the double-slit experiment at home in about 20 minutes with a red laser pointer, a square of aluminum foil and two razor blades taped together. The blades cut two parallel slits about 0.1 mm apart. Shine the laser through them in a dark room and a row of evenly spaced bright and dark bands appears on a wall 2 to 4 meters away.
Each band is a place where light from the two slits arrives either in step, adding into brightness, or out of step, cancelling into darkness. That pattern is the evidence Thomas Young used to argue that light is a wave, and the same pattern, built up one particle at a time, is the starting point of quantum mechanics. This guide covers the build, the physics behind every band, how to measure your laser’s wavelength from the pattern and a home version of the quantum eraser.
This guide contains Amazon affiliate links. 33Science earns a commission on qualifying purchases. See our affiliate disclosure.
Table of contents
- Quick version
- What you need
- Laser safety
- Make the double slit
- Set up and run the experiment
- What you should see
- Why the bands appear
- Measure your laser’s wavelength
- Try the quantum eraser at home
- What the home experiment proves
- History of the double-slit experiment
- Troubleshooting
- FAQ
- Sources
Quick version
- Tape two double-edge razor blades together with their edges flush.
- Tape a square of foil flat onto a piece of glass and draw the blade pair across it once, about 1 cm long.
- Tape the foil over a window cut in an index card and stand the card upright in a binder clip.
- Put the laser 10 to 30 cm in front of the slits and a white wall 2 to 4 m behind them.
- Turn off the lights and aim the beam at the slits. Bands about 1 to 2 cm apart appear on the wall.
What you need
| Item | What it does | Buy |
|---|---|---|
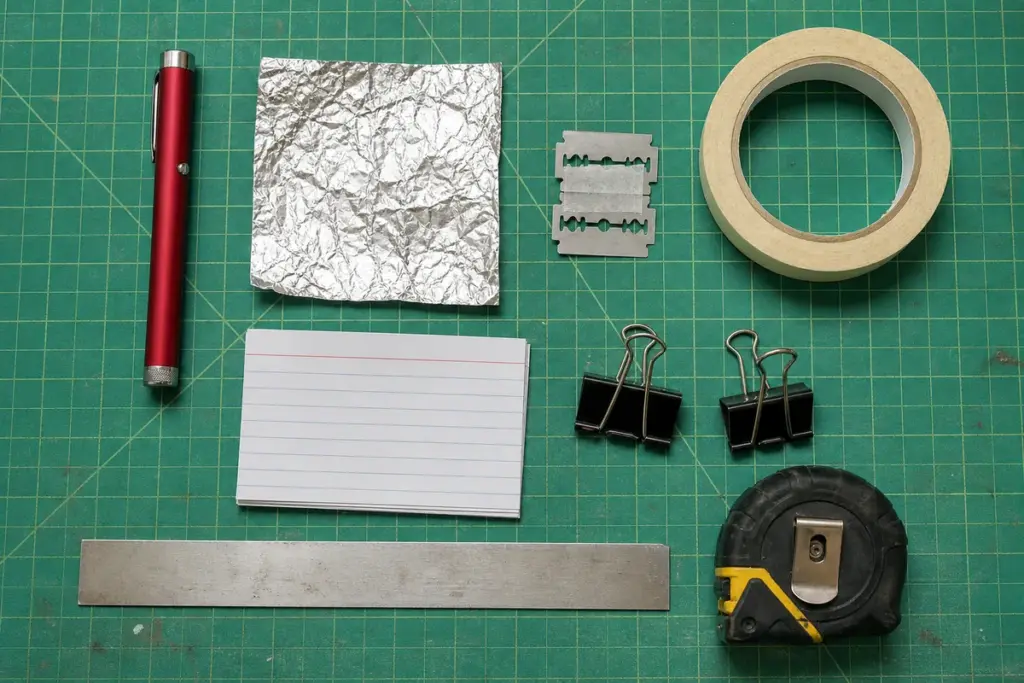
| Red laser pointer, Class 2 or 3R, 635 to 650 nm | The light source. Red is the easiest color to see and the safest to work with. | Red laser pointers |
| 2 double-edge safety razor blades | Their 0.1 mm thickness sets the distance between the slits. | Double-edge blades |
| Heavy-duty aluminum foil | The slit material. Heavy foil tears less when cut. | Amazon Basics heavy-duty foil |
| Glass or rigid clear plastic | A hard, flat backing for cutting. A picture frame pane or a microscope slide works. | Microscope slides |
| Index cards, binder clips, masking tape | Holds the foil upright in the beam. | Binder clips |
| Tape measure and metal ruler | Measures the distance to the wall and the band spacing. | Tape measures |
| Magnifying loupe (optional) | Checks that the two slits are separate before you test them. | 10x loupes |
| Polarizing film (optional) | Needed for the quantum eraser. | Linear polarizer sheets |
A plain red pointer is better than an expensive one. The pattern depends on wavelength, not power, and a weak beam is easier to look at on the wall.
Laser safety
Laser pointers sold in the US are limited to 5 milliwatts. A Class 2 pointer (under 1 mW) is safe for an accidental glance because the blink reflex closes the eye within about a quarter of a second. Class 3R (1 to 5 mW) can injure the eye if you stare into it.
- Never look into the beam, and never look at the bright spot on the foil from the laser’s side.
- Foil is a mirror. Tilt the slit card a few degrees so the reflected beam hits the floor or ceiling, not your face.
- Keep the beam below eye level and keep people and pets out of its path.
- Use a labeled red pointer from a known seller. In 2013 NIST tested 122 pointers and found that 44% of red and 90% of green pointers exceeded federal power limits, and many green pointers also leaked invisible infrared light.
- Children can run the experiment with an adult present. An adult should handle the razor blades.
The bands on the wall are scattered light and are safe to look at. If you work with anything stronger than a pointer, wear eye protection rated for that laser’s wavelength.
Make the double slit
The two slits must be narrow, parallel and close together, around 0.1 to 0.3 mm apart. Freehand cuts are too far apart to give visible bands. Two razor blades stacked together solve this: each double-edge blade is 0.1 mm thick with its edge ground at the center of that thickness, so the two cutting edges sit 0.1 mm apart.
Method 1: aluminum foil and razor blades
- Make the cutting tool. Stack two double-edge blades so their edges line up exactly. Wrap several layers of masking tape along one long edge of the stack to make a handle and to hold the blades together. Leave the other edge bare.
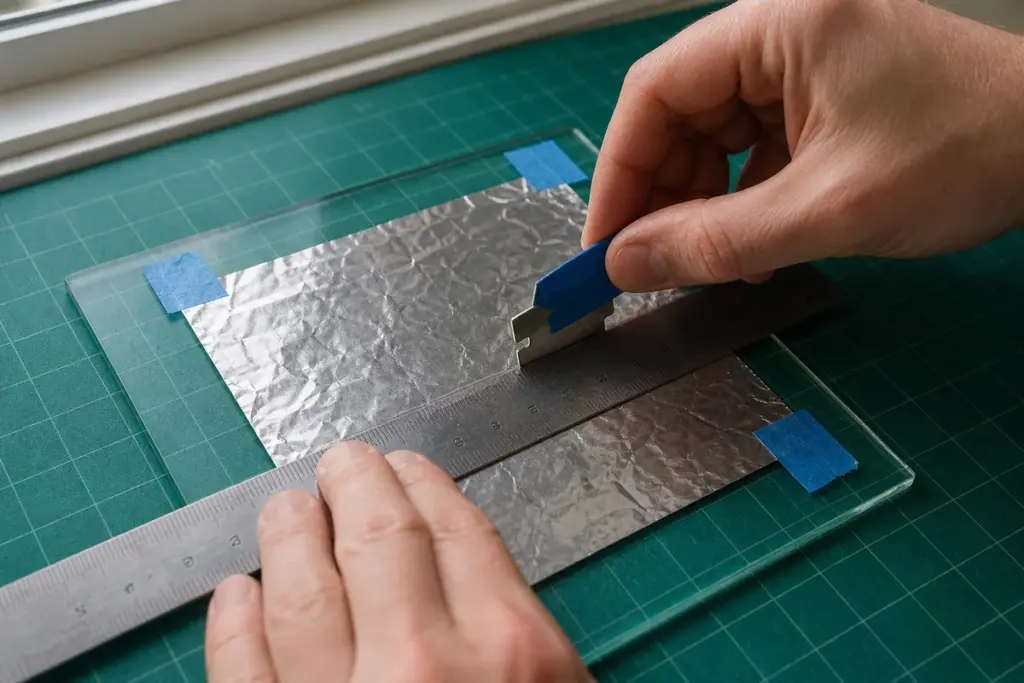
- Flatten the foil. Cut a 5 cm square, smooth it with a fingertip until it has no creases, and tape the corners to a pane of glass. Wrinkles bend the slits and smear the pattern.
- Cut once. Hold the blade pair upright against a ruler and draw it across the foil with light, even pressure for about 1 cm. Make one pass only. A second pass widens the slits and often joins them into one.
- Cut spares. Make three or four pairs on the same square, a few millimeters apart. Some will tear or merge, and you only need one good pair.
- Inspect. Hold the foil up to a lamp. A good cut shows as two fine parallel lines of light. A loupe shows whether they are separate.
- Mount it. Cut a 2 cm window in an index card and tape the foil over it with the slits vertical. Clip the bottom of the card in a binder clip so it stands on its own.
To widen the spacing, slip a strip of printer paper (about 0.1 mm) between the blades before you tape them. That doubles the slit spacing to about 0.2 mm and halves the band spacing, which is useful for comparing results.
Method 2: soot on a glass slide
Soot gives sharper slit edges than foil, so the bands come out cleaner. Hold a microscope slide with a clothespin or tongs and pass it through the tip of a candle flame until one side is evenly black. Let it cool for a minute, then draw the taped blades across the soot with very light pressure. The blades scrape the soot away and leave two clear lines in the glass. An adult should do the candle step.
Method 3: a ready-made slit slide
Physics suppliers sell film or glass slides with laser-cut single, double and multiple slits of known width and spacing. They take the guesswork out of measurement and let you compare two-slit and five-slit patterns side by side. Search for double slit slides.
Set up and run the experiment
- Darken the room. Do it at night with the lights off. The outer bands are faint and disappear in room light.
- Pick the screen. A white wall works. White printer paper taped to the wall is better because you can mark the bands on it. Put the slits 2 to 4 m from the screen. A longer distance spreads the bands farther apart but makes them dimmer.
- Fix the laser. Lay it on a stack of books at the height of the slits, 10 to 30 cm in front of them. Hold the button down with a rubber band or a binder clip so the beam does not wobble.
- Aim. Slide the card until the laser spot sits on the slits. A pointer beam is 1 to 3 mm wide, so it covers both slits at once.
- Tilt the card a few degrees so the reflection from the foil goes away from you.
- Look at the wall. The bands spread out at right angles to the slits. Vertical slits give a horizontal row of bands.
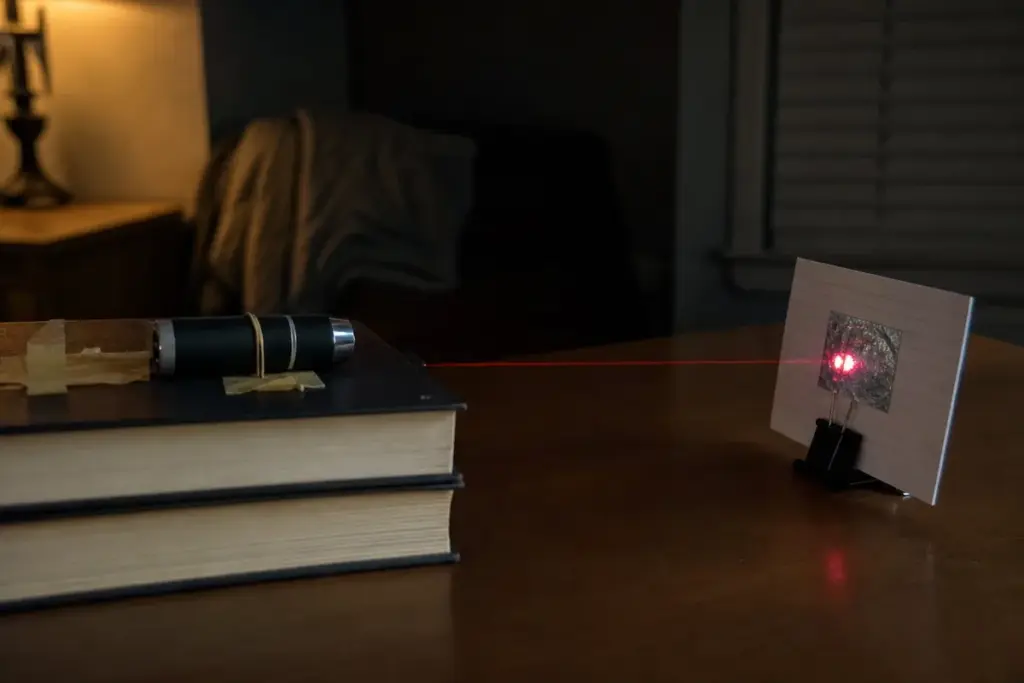
To photograph the pattern, set your phone to manual or pro mode and lower the exposure until the central band stops looking like a white blob. The camera sees the same thing your eye does, so filming does not change the result.
What you should see
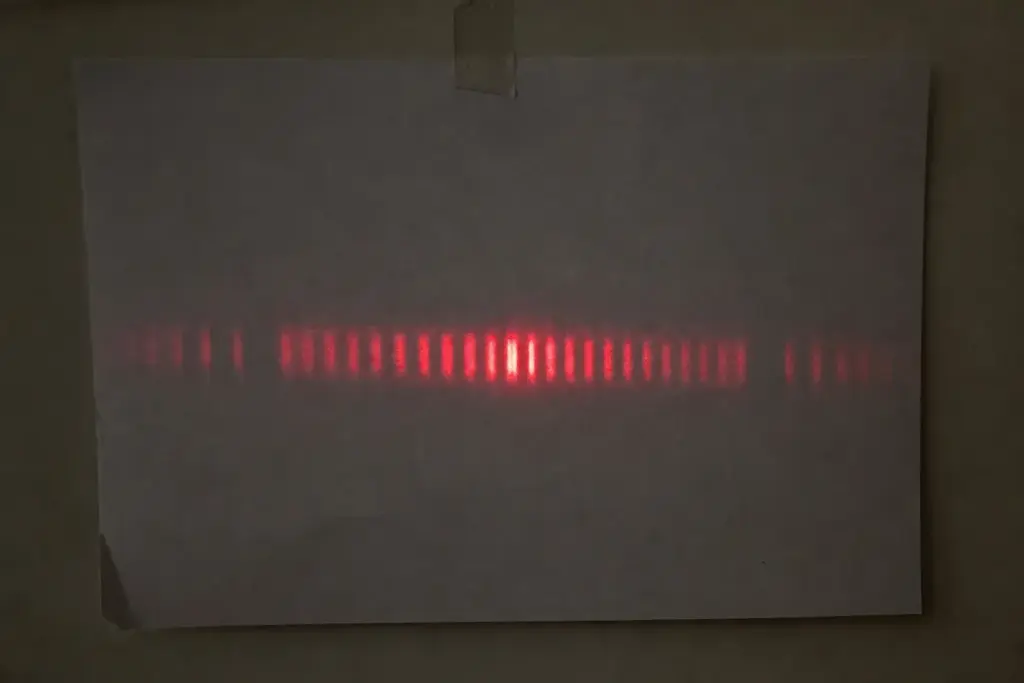
- A bright band in the center, where the beam would land with no foil in the way.
- Evenly spaced bright bands on both sides with dark gaps between them. With a 650 nm red laser, slits 0.1 mm apart and the wall 3 m away, the bands sit about 2 cm apart.
- Bands that dim in groups. The central group is the brightest, then comes a wide dark gap, then a fainter group. Sometimes a band is missing entirely where one should be.
Cut a single slit next to your pair and compare. One slit gives a wide central band with dimmer side bands and no fine stripes. The fine stripes appear only when light passes through both slits, which is the whole point of the experiment.
Why the bands appear
Three facts produce the pattern: each slit spreads the light out, the two spreading waves overlap, and where they overlap they either add or cancel depending on how far each one has traveled.
Each slit spreads the light
When a wave passes through an opening that is only a few dozen wavelengths wide, it does not continue as a narrow beam. It fans out from the opening in curved wavefronts. This is diffraction. Each slit becomes a new source of waves, and because the same laser wavefront reaches both slits at the same instant, the two new sources are perfectly in step.
Path difference decides bright or dark
Pick any point on the wall. Light from one slit has to travel slightly farther to get there than light from the other. That extra distance is the path difference.
- Bright band: the path difference is a whole number of wavelengths (0, 1, 2, 3…). The two waves arrive crest with crest and add up.
- Dark band: the path difference is a whole number plus one half (0.5, 1.5, 2.5…). One wave arrives with a crest while the other arrives with a trough, and they cancel.
For slits a distance d apart, light heading off at angle θ has an extra path of d sin θ. Bright bands sit where d sin θ = mλ, with m = 0, 1, 2 and so on. On a wall a distance L away, at small angles, that puts the bright bands at
y = mλL / d, so the spacing between neighboring bands is Δy = λL / d.
The formula explains every adjustment you can make. Bands spread out when the wall moves back (larger L), when the wavelength is longer (red instead of green) and when the slits are closer together (smaller d).
| Laser color | Wavelength | Band spacing, d = 0.1 mm | Band spacing, d = 0.2 mm |
|---|---|---|---|
| Red | 650 nm | 19.5 mm | 9.8 mm |
| Green | 532 nm | 16.0 mm | 8.0 mm |
| Violet | 405 nm | 12.2 mm | 6.1 mm |
All values are for a wall 3 m from the slits. Halve them for a wall 1.5 m away.
Why the bands come in groups
Each slit has its own width, and a single slit makes its own wide pattern with a dark gap at y = λL / a, where a is the slit width. The two-slit bands are drawn inside that wider pattern, called the envelope. The envelope sets how bright each band can be, which is why the bands dim in groups.
Where a bright band falls exactly on a dark gap of the envelope, it vanishes. That is the missing band some setups show. The central group holds about 2d/a − 1 bands, so slits that are narrow compared with their spacing give a long central group.
The dark bands do not destroy any light. Energy moves from the dark bands into the bright ones, and the brightest band is four times as bright as either slit would make it alone.
Measure your laser’s wavelength
Rearranging the spacing formula gives the wavelength: λ = Δy × d / L. Every number on the right comes from a ruler, so you can measure the wavelength of light at home.
- Tape paper to the wall and mark the center of each bright band with a pencil.
- Measure across 10 band spacings, for example from the 5th band left of center to the 5th band right, and divide by 10. One spacing is too small to measure accurately.
- Measure L from the foil to the wall.
- Use d = 0.1 mm for two bare blades, or 0.2 mm with a paper shim.
Example: 10 spacings measure 195 mm, so Δy = 19.5 mm. With L = 3.00 m and d = 0.100 mm, λ = 0.0195 m × 0.0001 m / 3.00 m = 650 nm, which matches the label on a standard red pointer.
The slit spacing is the weakest number. Blade thickness varies by a few percent, and the cut can drift, so expect a result within about 5% of the label. Run it in reverse to check your slits: enter the wavelength printed on the laser and your measured spacing, and the calculator returns the actual slit separation.
Double-slit calculator
Fill in any three boxes and leave one empty. The empty box is calculated from the other three using fringe spacing = wavelength × L / d.
Fringe spacing is the distance between the centers of two neighboring bright bands. Measure across 10 bands and divide by 10.
Try the quantum eraser at home
The quantum eraser shows that the bands disappear when the light carries a record of which path it took, and come back when that record is scrambled. Rachel Hillmer and Paul Kwiat published a home version in Scientific American in 2007. It uses a thin wire instead of slits: the beam splits around the wire, and the light passing each side acts as one of the two paths.
You need: a laser pointer, a short straight piece of thin wire (a straightened staple or the wire from a twist tie with the paper stripped off), a piece of cardboard and a sheet of linear polarizing film.
- Get the bands. Tape the wire vertically across a hole in the cardboard. Shine the laser on the wire and check that a row of bands appears on the wall.
- Tag the paths. Cut two small pieces of polarizing film. Turn one 90 degrees relative to the other (check by overlapping them: crossed pieces look dark). Tape them edge to edge so the seam runs exactly along the wire. Light passing left of the wire is now polarized one way, and light passing right is polarized the other way.
- Watch the bands vanish. The pattern turns into a smooth smear. Light waves polarized at right angles cannot cancel each other, so the polarization now records which side each part of the light went.
- Erase the record. Hold a third piece of film between the wire and the wall with its axis at 45 degrees. The bands return. Turn it to the opposite 45 degrees and they return shifted, with bright bands where the dark ones were. At 0 or 90 degrees only one side gets through and the bands stay gone.
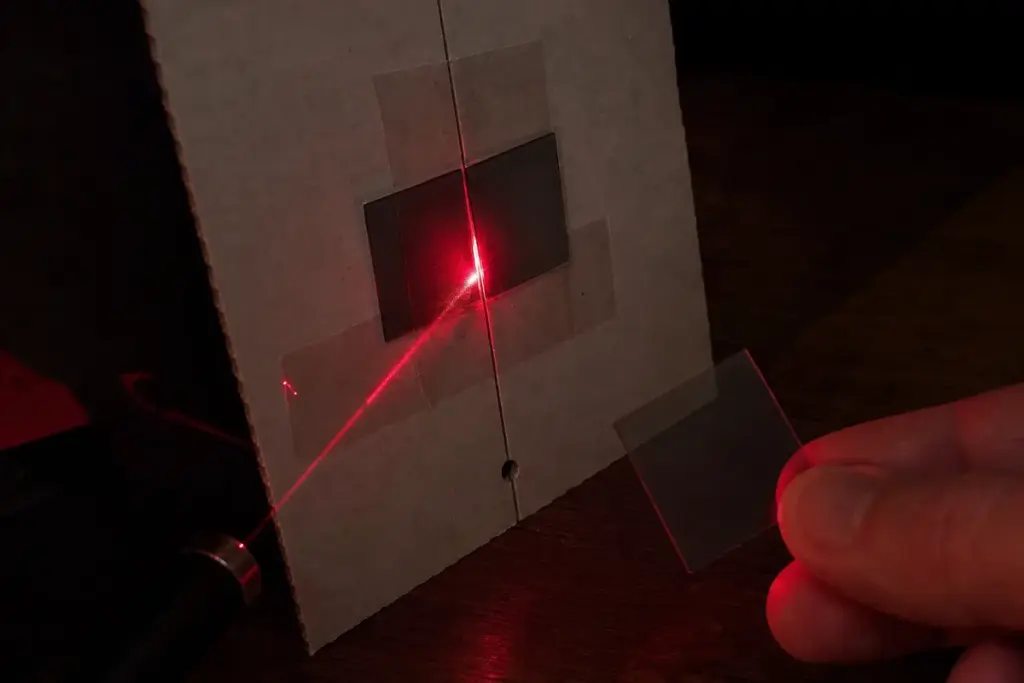
Most diode laser pointers emit polarized light. Rotate the pointer until both sides of the wire look equally bright, which puts its polarization at 45 degrees to both films. With laser light this is ordinary polarization optics. Done one photon at a time, the same arrangement is the quantum eraser that Marlan Scully and Kai Drühl proposed in 1982, and it gives the same result.
What the home experiment proves
The kitchen-table version proves that light interferes like a wave. It does not show single photons. A 1 mW red pointer emits about 3 × 10¹⁵ photons per second, so trillions arrive for every band you see.
The quantum puzzle appears when the source is dimmed until only one photon or electron is in the apparatus at a time. Each one lands as a single dot at one spot on the detector, like a particle. After thousands of dots, the same banded pattern builds up. Each particle behaves as if it went through both slits, and its landing spot can be predicted only as a probability. Your home pattern is that probability distribution drawn by a very large number of photons at once.
If a detector records which slit each particle passes through, the bands disappear and two plain stripes remain. This is the “observer effect” in the double-slit experiment, and it is often misdescribed. The observer is any physical interaction that leaves a record of the path, such as a detector or a polarization tag. No person needs to look, and consciousness plays no part. A phone filming the wall does not record which slit the light used, so it changes nothing. See myths about quantum mechanics for more on this.
History of the double-slit experiment
| Year | Experiment | What it showed |
|---|---|---|
| 1803 | Thomas Young splits a beam of sunlight with a thin card, about 1/30 inch thick, and reports the results to the Royal Society | Interference bands, evidence that light is a wave. His two-slit drawing appears in his 1807 lectures. |
| 1909 | G. I. Taylor photographs interference fringes with light so dim that exposures last up to about three months | The bands survive at extremely low intensity. |
| 1961 | Claus Jönsson sends electrons through two and more slits at the University of Tübingen | Electrons interfere like light. |
| 1974 | Pier Giorgio Merli, Gian Franco Missiroli and Giulio Pozzi in Bologna | The pattern builds up from single electrons. |
| 1989 | Akira Tonomura’s team at Hitachi films single electrons arriving one by one | The clearest record of single-particle buildup. |
| 1999 | Markus Arndt, Anton Zeilinger and colleagues in Vienna use C60 buckyballs | Molecules of 60 carbon atoms interfere. |
| 2002 | A Physics World reader survey by Robert Crease | The single-electron double-slit experiment is named the most beautiful experiment in physics. |
For readable accounts of what these results mean, see our list of the best quantum physics books for beginners. For the optics behind the experiment, see optics topics and these facts about optics.
Troubleshooting
| Problem | Cause | Fix |
|---|---|---|
| One wide blob with no fine bands | The slits merged into one, or the beam hits only one slit | Check with a loupe and cut a new pair with lighter pressure |
| Bands too close together to see | The wall is too close or the slits are too far apart | Move the wall back to 3 to 4 m, or remove any shim between the blades |
| Pattern too dim | Room light, a weak battery or a very distant wall | Make the room darker, replace the batteries or move the wall closer |
| Smeared, speckled or crooked bands | Wrinkled foil or torn slit edges | Flatten new foil on glass, or switch to soot on a slide |
| Bands run up and down instead of side to side | The slits are horizontal | Rotate the card so the slits are vertical |
| Pattern drifts or flickers | The laser is moving or the battery is fading | Clamp the button and wedge the laser between books |
FAQ
Yes. A red laser pointer, aluminum foil and two razor blades taped together are enough. Cut two slits about 0.1 mm apart, shine the laser through them in a dark room and a row of bands appears on a wall 2 to 4 m away.
Not easily. A flashlight produces many colors from a wide source, so its bands blur together. You need a narrow source such as sunlight through a pinhole, and the result is faint colored bands around a white center. A laser gives one wavelength in a narrow beam, which makes the bands sharp and bright.
A red Class 2 or Class 3R laser pointer between 635 and 650 nm. Red is the easiest to see and the safest, and the wavelength printed on the label lets you check your measurement.
Two to four meters from the slits. Closer than that, the bands are crowded together. Farther away, they spread out but get dimmer.
About 0.1 to 0.3 mm apart, with each slit narrower than the gap between them. Two double-edge razor blades taped together cut slits 0.1 mm apart.
A single slit diffracts light into a wide central band with fainter bands beside it. The two-slit pattern adds fine, evenly spaced bands inside that wider pattern. If you see only the wide bands, your two slits have merged into one.
It shows wave interference, which is the pattern quantum mechanics predicts for each photon. It does not show single photons, because a laser pointer sends trillions of photons per second through the slits.
No. A camera pointed at the wall records the pattern after the light has passed both slits. The bands disappear only when something records which slit the light went through.
With light, it proves light behaves as a wave. With single photons, electrons and molecules, it shows that particles arrive one at a time at single points while still building an interference pattern, and that any record of which slit they used removes the pattern.
Multiply the wavelength by the distance to the wall and divide by the slit spacing. For 650 nm light, a wall 3 m away and slits 0.1 mm apart, the bands are 19.5 mm apart.
Sources
- Young, T. (1804). Experiments and calculations relative to physical optics. Philosophical Transactions of the Royal Society
- Jönsson, C. (1961). Elektroneninterferenzen an mehreren künstlich hergestellten Feinspalten. Zeitschrift für Physik
- Tonomura, A. et al. (1989). Demonstration of single-electron buildup of an interference pattern. American Journal of Physics
- Arndt, M. et al. (1999). Wave-particle duality of C60 molecules. Nature
- Scully, M. and Drühl, K. (1982). Quantum eraser. Physical Review A
- Hillmer, R. and Kwiat, P. (2007). A do-it-yourself quantum eraser. Scientific American
- Physics World (2002). The double-slit experiment
- JoVE Science Education. Interference and Diffraction
- HyperPhysics. Double slit interference
- NIST (2013). Tests underscore potential hazards of green laser pointers
- US FDA. Laser products and instruments